
Build a Live Bait Tank
For some fishing, you will need a way to keep live baitfish. Here's a way to build a live bait tank from basic items you can buy at the local building supply or hardware store. Even if you're not that "handy", you should be able to build this bait tank with a little effort
Click on photos for larger image
Click on photos for larger image
Get the Parts
To build the bait tank, you'll need a standard issue, five gallon paint bucket.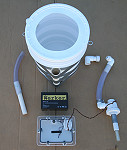 Make sure you get the lid. You'll need some common PVC pipe, fittings and PVC cement, these are described below. Also, some 1" ID-1 1/4" OD tubing with a hose clamp to fit the tubing and an Attwood A500 bait pump and a battery to power it. This setup uses a Werker 7.5Ah sealed lead acid battery. Everything except the battery was purchased at the local Mega Mart. You'll also need two 1/4"-20 stainless steel eyebolts, four flat washers and two 1/4-20 stainless steel lock nuts. Got those at the local hardware store.
To build the bait tank, you'll need a standard issue, five gallon paint bucket.
 Make sure you get the lid. You'll need some common PVC pipe, fittings and PVC cement, these are described below. Also, some 1" ID-1 1/4" OD tubing with a hose clamp to fit the tubing and an Attwood A500 bait pump and a battery to power it. This setup uses a Werker 7.5Ah sealed lead acid battery. Everything except the battery was purchased at the local Mega Mart. You'll also need two 1/4"-20 stainless steel eyebolts, four flat washers and two 1/4-20 stainless steel lock nuts. Got those at the local hardware store.
Drill Inlet/Outlet Holes and Attach Eyebolts
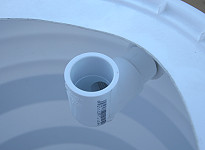
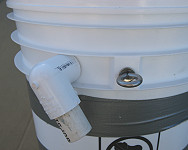
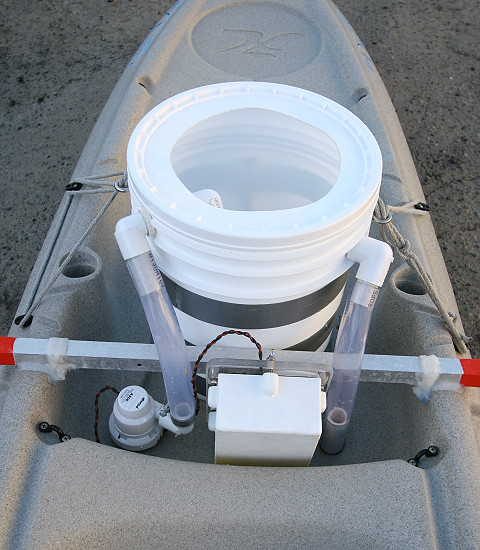
Drill two 1" diameter holes, opposite each other in the five gallon bucket. One hole, the inlet, must be above the level of the other hole(the outlet). The bottom of the inlet hole should be about even with the top of the outlet hole. It's easiest to use a hole saw, but if you don't have one, you can drill and grind, or cut the 1" diameter holes. If the bucket has ribs, like the one in the photo, you'll have to cut them away from the hole so the PVC fittings can fit into the holes.

There are two reinforced spots on the bucket where the handle attaches to it. This is where the two eyebolts will got to lash the bait tank to the kayak. Drill a hole in the spot where the bucket's handle went so the eyebolt will fit. If there is a gap in the molding between the bucket and where the handle went, you might stick a piece of wood or plastic in there for extra strength. Using the flat washers, attach the eyebolts with the stainless steel lock nuts.
Inlet Fittings
For the inlet fitting, you need a PVC fitting that rotates(a hose fitting) so you can turn it up to prime the bait pump, then turn it down to fill the bucket.

This fitting is the one on the left in the photo. It has a 90 degree elbow on it. On the right is a 90 degree elbow with a threaded fitting to screw into the rotating hose fitting. The other side of the elbow has a piece of 3/4" PVC pipe that a piece of 1 1/4" OD tubing fits over.
For the inlet fitting, you need a PVC fitting that rotates(a hose fitting) so you can turn it up to prime the bait pump, then turn it down to fill the bucket.
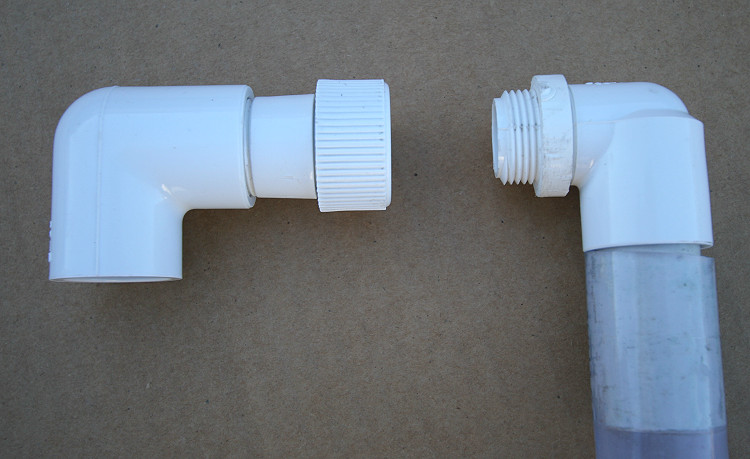
This fitting is the one on the left in the photo. It has a 90 degree elbow on it. On the right is a 90 degree elbow with a threaded fitting to screw into the rotating hose fitting. The other side of the elbow has a piece of 3/4" PVC pipe that a piece of 1 1/4" OD tubing fits over.
In this photo, the rotating hose fitting is screwed into the elbow leading to the bait pump.
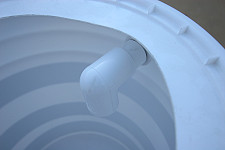
The fitting is turned up so water can be poured into it to prime the bait pump.

The fitting is turned up so water can be poured into it to prime the bait pump.
In this photo, the rotating fitting is turned down so water from the bait pump fills up the bucket.
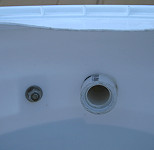
The bucket lid has the center cut out leaving an inch or two at the edge. This keeps water from splashing out of the bait tank. Also, lively baitfish will swim along the sides of the bucket and if the lid was not there they could jump out of the bait tank.

The bucket lid has the center cut out leaving an inch or two at the edge. This keeps water from splashing out of the bait tank. Also, lively baitfish will swim along the sides of the bucket and if the lid was not there they could jump out of the bait tank.
Outlet Fitting
The outlet fitting is a basic 90 degree elbow.
There is a piece of 3/4" PVC pipe on the outside part for 1 1/4" OD tubing to fit onto.
The outlet fitting is a basic 90 degree elbow.

There is a piece of 3/4" PVC pipe on the outside part for 1 1/4" OD tubing to fit onto.
On the inside, a piece of 3/4" PVC pipe is glued inside a small piece of 1" ID PVC to hold the fitting in place.
The outlet fitting needs to rotate, so don't glue the 1" ID fitting too tightly against the bucket. In these photos you can also see how the eyebolts are attached.

The outlet fitting needs to rotate, so don't glue the 1" ID fitting too tightly against the bucket. In these photos you can also see how the eyebolts are attached.
Bait Pump
The Attwood A500 Bait Pump fits into the rear scupper hole behind the seat.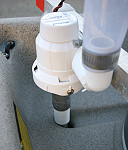 A little duct tape wrapped around the threaded part of the pump ensures a snug fit. You need a 90 degree PVC elbow that screws into the bait pump fitting. On the other side of the elbow is a piece of 3/4" PVC pipe so the 1 1/4" OD tubing can fit on. Good idea to use a hose clamp to hold the tubing on the PVC pipe. Water is sucked in through the scupper and pumped up and into the bait tank. If you don't have a scupper nearby, you can attach a hose to the pump inlet and hang it over the side of the kayak.
The Attwood A500 Bait Pump fits into the rear scupper hole behind the seat.
 A little duct tape wrapped around the threaded part of the pump ensures a snug fit. You need a 90 degree PVC elbow that screws into the bait pump fitting. On the other side of the elbow is a piece of 3/4" PVC pipe so the 1 1/4" OD tubing can fit on. Good idea to use a hose clamp to hold the tubing on the PVC pipe. Water is sucked in through the scupper and pumped up and into the bait tank. If you don't have a scupper nearby, you can attach a hose to the pump inlet and hang it over the side of the kayak.
 Attach the 1 1/4" OD tubing from the bait pump to the inlet fitting. When you want to set up the bait tank, all you have to do is stick the pump into the scupper, stick the inlet fitting through the bucket and screw in the rotating side of the inlet fitting.
Scupper Outlet
For the bait pump outlet, cut a piece of 3/4" PVC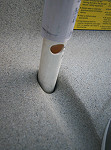 and attach a piece of 1 1/4" OD tubing. Make sure the PVC pipe does not stick out past the bottom of the kayak because it will be a problems if you should drag your kayak across the beach. At the deck level of the scupper, drill a hole in the PVC pipe to let water out. With the bait pump in the other rear scupper, there needs to be some way for water to drain out of the rear part of the kayak.
For the bait pump outlet, cut a piece of 3/4" PVC
 and attach a piece of 1 1/4" OD tubing. Make sure the PVC pipe does not stick out past the bottom of the kayak because it will be a problems if you should drag your kayak across the beach. At the deck level of the scupper, drill a hole in the PVC pipe to let water out. With the bait pump in the other rear scupper, there needs to be some way for water to drain out of the rear part of the kayak.
Cut the tubing from the outlet PVC pipe in the rear scupper so it fits on the outlet fitting on the bait tank.
Final Fitting
In this photo you can see the basic position of the inlet and outlet fittings, the pump and the battery.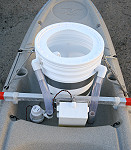 As far as the battery goes, you can use a Tupperware-type container, Pelican case or some other kind of waterproof box. You'll need to have some kind of ON-OFF switch on the waterproof battery box. The battery box in this setup fits between the inlet and outlet fittings and behind the seat. If you want to go the absolute cheap route, you can stick the battery in a waterproof roll-up bag.
In this photo you can see the basic position of the inlet and outlet fittings, the pump and the battery.
 As far as the battery goes, you can use a Tupperware-type container, Pelican case or some other kind of waterproof box. You'll need to have some kind of ON-OFF switch on the waterproof battery box. The battery box in this setup fits between the inlet and outlet fittings and behind the seat. If you want to go the absolute cheap route, you can stick the battery in a waterproof roll-up bag.
This bait tank uses the stainless steel eyebolts to lash the bait tank to the kayak with rope. Some kayakers will put the bait tank and battery box in a milk crate. The PVC pipe duct taped to the bait tank is a fishing rod holder. With the 12v 7.5Ah battery, the A500 pump can be a little too effective, pumping water at a rate that is too high for a small bait tank. If you switch the polarity of the pump, that is, attach the positive lead of the pump to the negative terminal of the battery and the negative lead of the pump to the positive battery terminal, the pump will pump water at a slower rate. The battery and the pump are not harmed when you do this.

Back to the Kayak Rigging Page
Back to the Kayak Fishing Page
watermanatwork Home Page
Waterman At Work Blog
Contact Us
Back to the Kayak Fishing Page
watermanatwork Home Page
Waterman At Work Blog
Contact Us
All material on this website is the property of the owner and may not be used without permission.
© watermanatwork.com