
Install a Fishfinder
Having a fishfinder can be a big advantage when fishing from a kayak. Being able to find underwater structure is a good way to find fish. This is especially true if you are fishing in a location you are not familiar with. Here we will install a basic fishfinder. It is an inexpensive unit, but has plenty of features, including a temperature sensor and sixty degree fish detection to 800 feet. Keep in mind a fishfinder on a kayak is exposed to the elements, so if a $100 unit will do the job, using a $500 finder may not be the best choice. This is a "through hull" installation; be sure the fishfinder you buy has a transducer that can be mounted this way.
Click on photos for larger image
Click on photos for larger image
Select a Battery
Once you decide on a fishfinder, you'll need a battery. Look in the fishfinder specs for the power draw. Almost all fishfinders are 12 volt, but you can use eight AA, C or D batteries if you choose. This FishEasy 240 draws 170 ma, 240 ma with the backlight on.
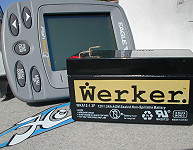
The 1.3Ah battery in the photo will power the fishfinder for about six to eight hours. If you want more time, you'll need a bigger battery. You can use NiMH AA rechargeable batteries or a portable device battery pack instead of a heavier sealed lead acid battery.
Layout
Figure out exactly where you want the fishfinder. Make sure it does not interfere with paddling, pedalling or opening the front hatch. The flat area between the footwells and behind the hatch is a good place for a fishfinder on this particular kayak, that's where this one is going. If you have a pedal-powered kayak, you may need to mount the fishfinder on a RAM mount and/or rail system. There are many options for this type of gear mounting system.

After sitting in the kayak and checking out the position of the fishfinder, put masking tape on the hull and trace the outline of the fishfinder pedestal so you can drill the mounting holes in the correct place. It's a good idea to use a backing plate for extra strength. In this installation, a piece of 3/8" thick cast acrylic is used as the backing plate. The edges have been rounded off to conform to the inside of the hull.
Mount the Transducer
There are a number of ways to mount the fishfinder's transducer. Since this kayak goes through the surf in the ocean and is transported on a rooftop truck rack, we wanted the most secure mounting method.
Determine where the transducer is to be mounted. This one is going to be mounted on the inside of the kayak "shooting through" the hull. It has to go on a flat part of the hull so the transducer is parallel to the bottom of the body of water. Because fishing rods are stowed below deck down the center of this kayak through the front hatch, the transducer will be mounted to the side of the 8" center hatch, leaving room for the fishing rods in the center of the kayak.

First, we used a thin piece of plastic tubing that the transducer fits inside for a secure mount. The transducer is round on the bottom so this piece of plastic stabilizes the transducer. The plastic was attached to the bottom of the kayak with Lexel. Roughen the surface with sandpaper before the attaching the plastic with Lexel. Allow 2-4 days to cure.
Next, apply some Lexel to the bottom of the transducer. Make sure you apply it carefully so you don't create any air bubbles. Place the transducer inside the plastic ring and push down firmly until the transducer contacts the hull. Once again, don't create any air bubbles in the Lexel. Make sure the transducer is parallel to the bottom of the hull and it is pointed forward. When you've got the transducer placed correctly, gently put a weight(like a brick) on the top of it and let it cure for a couple days.
Mount the Battery
There are many options for mounting and wiring the fishfinder battery. It's got to stay dry, so if you kayak on a lake or bay, you can stick it in a waterproof box ranging from a Tupperware-type container to a Pelican case and stick it below deck.
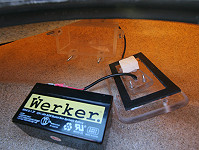
Since this kayak is rigged for extreme conditions, a more secure battery box is needed. A box was made out of 1/4" cast acrylic. The cover is 3/8" cast acrylic which is held in place by 8-32 stainless steel studs and nylon wing nuts.
This battery box is mounted to the side of the 8" center hatch, across from the transducer, so it can be accessed easily through the hatch.
The battery box is securely held in place by 8-32 bolts that go through the hull and into the side storage compartment. A 1/4" cast acrylic backing plate is used and the stainless steel lock nuts are sealed with silicone sealer.

This is what it looks like with the battery in the box, cover on, ready to go.
There are many options for mounting and wiring the fishfinder battery. It's got to stay dry, so if you kayak on a lake or bay, you can stick it in a waterproof box ranging from a Tupperware-type container to a Pelican case and stick it below deck.

Since this kayak is rigged for extreme conditions, a more secure battery box is needed. A box was made out of 1/4" cast acrylic. The cover is 3/8" cast acrylic which is held in place by 8-32 stainless steel studs and nylon wing nuts.
This battery box is mounted to the side of the 8" center hatch, across from the transducer, so it can be accessed easily through the hatch.

The battery box is securely held in place by 8-32 bolts that go through the hull and into the side storage compartment. A 1/4" cast acrylic backing plate is used and the stainless steel lock nuts are sealed with silicone sealer.

This is what it looks like with the battery in the box, cover on, ready to go.
Mount the Fishfinder
With the transducer and battery in place, mount the fishfinder pedestal. Drill a hole in the hull for the fishfinder plug. Some kayaks have fishfinder connections pre-installed and aftermarket bulkhead connections are available. If you are using a RAM mount, you can skip this step.

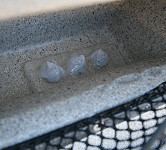
In this case, the stainless steel socket head machine screws screw into threaded holes in the backing plate. The backing plate has been routed out for the wires so the backing plate mounts flush against the hull.

Use silicone seal between the backing plate and the hull, and on the stainless steel machine screws that mount the pedestal so there is no leakage. Use zip ties to attach the transducer and power cables to the scupper holes to keep them out of the way and prevent them from getting tangled in any gear you might stow below deck.
With the transducer and battery in place, mount the fishfinder pedestal. Drill a hole in the hull for the fishfinder plug. Some kayaks have fishfinder connections pre-installed and aftermarket bulkhead connections are available. If you are using a RAM mount, you can skip this step.

In this case, the stainless steel socket head machine screws screw into threaded holes in the backing plate. The backing plate has been routed out for the wires so the backing plate mounts flush against the hull.

Use silicone seal between the backing plate and the hull, and on the stainless steel machine screws that mount the pedestal so there is no leakage. Use zip ties to attach the transducer and power cables to the scupper holes to keep them out of the way and prevent them from getting tangled in any gear you might stow below deck.
Test It Out
Connect the battery, plug in the fishfinder and check it out.
You won't be 100% sure it's working correctly until you get out on the water, but you can get a pretty good idea even if the kayak is sitting in your driveway.
Connect the battery, plug in the fishfinder and check it out.

You won't be 100% sure it's working correctly until you get out on the water, but you can get a pretty good idea even if the kayak is sitting in your driveway.
Go Fishing
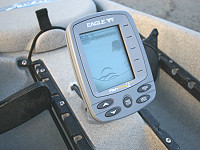
If the fishfinder is working correctly, you should get a clear readout. If you got bubbles in the Lexel while mounting the transducer, you may see some ghost images or have a distorted display. This unit has no problem "shooting through" the kayak's hull, the readout is accurate and sharp. It takes about an hour for the temperature reading to be accurate, apparently that's how long it takes for the hull to become the same temperature as the water. You may have to tweak the sensitivity settings of the fishfinder to get the fish identification working correctly, but as you can see in the photo above, it will clearly show you where the fish are. Getting the fish into your kayak is another thing altogether.
If the fishfinder is working correctly, you should get a clear readout. If you got bubbles in the Lexel while mounting the transducer, you may see some ghost images or have a distorted display. This unit has no problem "shooting through" the kayak's hull, the readout is accurate and sharp. It takes about an hour for the temperature reading to be accurate, apparently that's how long it takes for the hull to become the same temperature as the water.
 You may have to tweak the sensitivity settings of the fishfinder to get the fish identification working correctly, but as you can see in the photo above, it will clearly show you where the fish are. Getting the fish into your kayak is another thing altogether.
There are many different hull configurations for fishing kayaks and your kayak may not be like the one in this fishfinder installation, but it should give you an idea of what you need to do. Every kayak fisherman can rig his or her kayak the way they want, so do some research and take your time with your installation, expecially when it comes to drilling holes in your kayak.
Back to the Kayak Rigging Page
Back to the Kayak Fishing Page
watermanatwork Home Page
Waterman At Work Blog
Contact Us
Back to the Kayak Fishing Page
watermanatwork Home Page
Waterman At Work Blog
Contact Us
All material on this website is the property of the owner and may not be used without permission.
© watermanatwork.com