
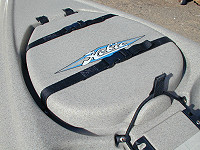
Modify Hatch to Prevent Leaking
If you take your kayak through the surf, kayak in river whitewater or if your kayak should flip over, water can leak through the hatches. If you use your kayak on a lake or bay, there shouldn't be much leaking so you don't have to worry about it. These modifications are for more extreme water conditions. You can do one or two of the modifications and stop most of the leakage. If you do all these improvements, there will be very little water leaking through the front hatch, even under the most extreme conditions.
Click on photos for larger image
Click on photos for larger image
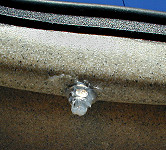
Seal the Factory Gasket
The first thing you can do is very simple. Use some silicone sealer and glue the factory gasket to the hull. This prevents water from leaking between the gasket and the hull.

Use more silicone seal to close the gaps in the gasket. Then use some Super Glue and glue the soft rubber part of the gasket together where there is a gap. Click on the photo and look for the red arrow.
Install Hatch Straps
The next step is to install straps to compress the hatch to make a tighter seal against the hatch gasket. This modification will stop 90% of water leakage.
These nylon straps and plastic buckles are very common, sold as luggage straps or as backpacking and camping accessories, you can get them at hardware or sporting goods stores for less than $10 a pair.
Figure out where the straps will be attached to the kayak. Cut the straps in half. Use a butane lighter to melt the ends of the nylon straps so they do not get frayed. Use 1/4-20" stainless steel machine screws, flat washers and lock nuts; common hardware available at most hardware stores, to attach the nylon straps to the kayak.
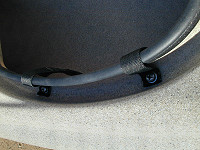
Double check the placement of the straps, mark where the holes will be drilled in the kayak hull. Double the end of the nylon straps and punch out or cut a hole so the bolt can go through. Drill holes in the kayak for the bolts. Use flat washers on top of the doubled part of the strap and on the inside of the hull.
Tighten the stainless steel lock nut on the inside of the kayak.
Use silicone seal to prevent water from leaking around the bolt and nut. Seal everything as you go for a completely dry boat.
Close the hatch and tighten the straps. Check to make sure the straps are not preventing the hatch from closing completely against the gasket.

Cut small notches in the hatch to create clearance for the straps so when the straps are tightened the hatch compresses firmly against the hatch gasket.
The next step is to install straps to compress the hatch to make a tighter seal against the hatch gasket. This modification will stop 90% of water leakage.

These nylon straps and plastic buckles are very common, sold as luggage straps or as backpacking and camping accessories, you can get them at hardware or sporting goods stores for less than $10 a pair.
Figure out where the straps will be attached to the kayak. Cut the straps in half. Use a butane lighter to melt the ends of the nylon straps so they do not get frayed. Use 1/4-20" stainless steel machine screws, flat washers and lock nuts; common hardware available at most hardware stores, to attach the nylon straps to the kayak.

Double check the placement of the straps, mark where the holes will be drilled in the kayak hull. Double the end of the nylon straps and punch out or cut a hole so the bolt can go through. Drill holes in the kayak for the bolts. Use flat washers on top of the doubled part of the strap and on the inside of the hull.
Tighten the stainless steel lock nut on the inside of the kayak.

Use silicone seal to prevent water from leaking around the bolt and nut. Seal everything as you go for a completely dry boat.
Close the hatch and tighten the straps. Check to make sure the straps are not preventing the hatch from closing completely against the gasket.

Cut small notches in the hatch to create clearance for the straps so when the straps are tightened the hatch compresses firmly against the hatch gasket.
Install Outer Hatch Gasket
This modification is only needed for the most extreme water conditions like ocean waves or river rapids.

With this outer gasket installed, there should be no hatch leakage, even if the boat should flip over in rugged water situations. For extreme kayaking conditions, this an effective safety modification that keeps gear stored below dry as well.
Use a piece of cardboard and make a template that fits inside the front hatch and is about 1 1/4" wide. Make sure that when you make the gasket, it is going to press against the factory gasket that attached to the hull. Once you have your cardboard template made, you'll need a piece of 3/8" thick sheet rubber. You might have to look around for a place to buy it, rubber and plumbing supply stores should have it, check the yellow pages. If you can't get a sheet large enough, you can glue two smaller sheets together with Super Glue before you cut the gasket. The gasket in the photo above is made from two pieces that were glued together. Trace your cardboard template and cut out the gasket with a sharp knife or Xacto blade. Be careful not to cut yourself.
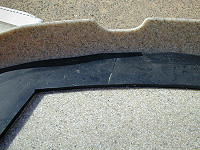
Once you have the gasket cut out, make sure it fits inside the hatch and that it is covering the entire factory gasket. Use some sandpaper to rough up the inside of the hatch and the side of the gasket that fits against the hatch. Don't sand the side of the gasket that is going to make contact with the factory gasket. Use silicone seal and glue the rubber gasket to the inside of the hatch. Give it a good twenty four hours to dry and you'll be ready for leak-free kayaking in just about any conditions.
Back to the Kayak Rigging Page
Back to the Kayak Fishing Page
watermanatwork Home Page
Waterman At Work Blog
Contact Us
Back to the Kayak Fishing Page
watermanatwork Home Page
Waterman At Work Blog
Contact Us
All material on this website is the property of the owner and may not be used without permission.
© watermanatwork.com